
<p>Spring Boot Starter Pulsar [1] 是Spring 官方为 Apache Pulsar 开发的构建项目,该项目允许开发者轻松集成 Pulsar 客户端,并通过 Spring Boot 的方式,快速构建和开发 Pulsar 应用程序。</p> 本文将带领大家基于SpringBoot 快速构建一个 Pulsar 实时应用。
快速开始
准备一个Pulsar Standalone 集群
Pulsar 支持 Standalone 模式启动服务,并且功能与集群模式几乎一致,我们可以据此快速搭建测试服务。
- 参考:Run a standalone Pulsar cluster locally[2]
下载Pulsar 二进制包(本文以 3.0.7 LTS版本示例):
-
Apache 地址:https://archive.apache.org/dist/pulsar/
-
阿里云镜像:https://mirrors.aliyun.com/apache/pulsar/
下载二进制包
wget https://archive.apache.org/dist/pulsar/pulsar-3.0.7/apache-pulsar-3.0.7-bin.tar.gz
解压文件:
tar -xvzf apache-pulsar-3.0.7-bin.tar.gz
#启动服务 cd apache-pulsar-3.0.7 bin/pulsar standalone
准备一个spring-boot-starter-pulsar工程
引入依赖
SpringBoot 的集成第一步,需要将 spring-boot-starter-pulsar[3] 库添加到项目中。
Maven方式构建
<dependencies>
    <dependency>
            <groupId>org.springframework.boot</groupId>
            <artifactId>spring-boot-starter-pulsar</artifactId>
            <version>3.2.5</version>
        </dependency>
</dependencies>
Gradle方式构建
dependencies {
    implementation 'org.springframework.boot:spring-boot-starter-pulsar:3.2.5'
}
配置客户端
SpringBoot 的将 Pulsar 连接信息封装进一个 PulsarClient的 YAML 配置文件中,常用参数如下:
spring:
  pulsar:
    client:
      service-url: pulsar://127.0.0.1:6650 # 服务连接地址
      #service-url: pulsar+ssl://127.0.0.1:6651 # 开启 SSL 安全通信的连接配置方式
      auth-plugin-class-name: org.apache.pulsar.client.impl.auth.AuthenticationToken # 示例使用 JWT Token 认证插件
      authentication:
        token: YOUR_PULSAR_TOKEN # token 信息
编写生产者
SpringBoot提供了自动配置的PulsarTemplate,这是一个开箱即用的工具,用于向指定topic发送数据。PulsarTemplate支持通过ProducerBuilderCustomizer进行灵活的自定义配置。这些配置选项包括设置访问模式、定制消息路由、添加拦截器,以及控制chunk和batch功能的开启或关闭。
发送消息
@Autowired
PulsarTemplate<byte[]> pulsarTemplate;
//同步消息发送
public MessageId sendMessage(String topic, byte[] message) throws PulsarClientException {
    return this.pulsarTemplate.send(topic, message);
}
发送包含 Schema的消息
-
定义对象
public class RequestBody {
 private String from;
 private User user;
 // Getter & Setter..
}
public class User {
 private String ID;
 private String name;
 private Integer age;
 // Getter & Setter..
}
public class Employee extends User {
 private String title;
 // Getter & Setter..
}
-
注册 Schema
@Bean public SchemaResolver.SchemaResolverCustomizer<DefaultSchemaResolver> schemaResolverCustomizer() { return (schemaResolver) -> { schemaResolver.addCustomSchemaMapping(RequestBody.class, Schema.JSON(RequestBody.class)); schemaResolver.addCustomSchemaMapping(User.class, Schema.JSON(User.class)); schemaResolver.addCustomSchemaMapping(Employee.class, Schema.JSON(Employee.class)); }; } -
发送消息
 public MessageId sendTestMessage4Json() throws PulsarClientException {
     // No topic assigned, send message to test topic.
     RequestBody body = new RequestBody();
     Employee employee = new Employee("001", "Xuwei", 33);
     employee.setTitle("Software Engineer");
     body.setFrom("test");
     body.setUser(employee);
     return sendMessage(commonConfig.getTestTopicJson(), body);
 }
“
SpringBoot 也支持在 YAML 中注册自定义Schema,示例如下:
“
spring:
  pulsar:
    defaults:
      type-mappings:
        - message-type: com.ascentstream.demo.entity.RequestBody
          schema-info:
            schema-type: JSON
        - message-type: com.ascentstream.demo.entity.User
          schema-info:
            schema-type: JSON
常用生产者配置
-
使用
ProducerCustomizer自定义生产者参数public MessageId sendMessageWithProducerCustomizer(String topic, byte[] message, int timeout, TimeUnit unit, BatcherBuilder builder) throws PulsarClientException { /** * ProducerCustomizer可用于添加超时时间、访问模式、自定义消息路由和拦截器,以及启用或禁用chunk和batch等。 */ return this.pulsarTemplate.newMessage(message).withTopic(topic) .withProducerCustomizer(pc->{ pc.batcherBuilder(builder).sendTimeout(timeout,unit).enableBatching(true).batchingMaxMessages(10); }).send(); } -
指定消息Key
// 指定消息Key public <T> MessageId sendMessageWithKey(String topic, T message, String key) throws PulsarClientException { if (StringUtils.isEmpty(key)) { return sendMessage(topic, message); } else { return pulsarTemplate.newMessage(message) .withTopic(topic) .withMessageCustomizer(messageBuilder -> { messageBuilder.key(key); }).send(); } } -
指定压缩类型
  public <T> MessageId sendMessage(String topic, T message, CompressionType compressionType) throws PulsarClientException {
      if (compressionType == null || compressionType == CompressionType.NONE) {
          return sendMessage(topic, message);
      } else {
          return pulsarTemplate.newMessage(message)
                  .withTopic(topic)
                  .withProducerCustomizer(producerBuilder -> {
                      producerBuilder.compressionType(compressionType);
                  }).send();
      }
  }
编写消费者
在SpringBoot中,我们可以轻松实现对指定topic消息的监听和接收:
- Pulsar 监听器: 定义一个 Pulsar 监听器(
@PulsarListener)用来描述如何接收消息; - 自动配置:SpringBoot会自动为标记了
@PulsarListener注解的监听方法配置所有必要的组件。
启用 Pulsar 监听器(@PulsarListener)
通过在 main 方法上添加 @EnablePulsar 注解即可启用Pulsar 监听器。
    @EnablePulsar
    @SpringBootApplication(scanBasePackages = {"com.ascentstream.demo"})
    public class PulsarSpringbootDemoApplication {
        public static void main(String[] args) {
            SpringApplication.run(PulsarSpringbootDemoApplication.class, args);
        }
    }
开启订阅和消费
我们以 Pulsar 默认的Exclusive 订阅为例来开启订阅和消费。
    @PulsarListener(
            schemaType = SchemaType.STRING,
            subscriptionName = "subscription-Exclusive",
            subscriptionType = SubscriptionType.Exclusive,
            ackMode = AckMode.MANUAL,
            topics = {"${pulsar.topic.test-topic: test-topic}"},
            autoStartup = "true",
            batch = true,
            properties = { "consumerName=consumerExclusiveA" }
    )

    public void listen4ExclusiveA(List<Message<String>> messages, Consumer<String> consumer) {
        logger.info("consumer {} received messages, size: {}", consumer.getConsumerName(), messages.size());
        messages.forEach((message) -> {
            try {
                consumer.acknowledge(message);
            } catch (IOException e) {
                throw new RuntimeException(e);
            }
        });
    }
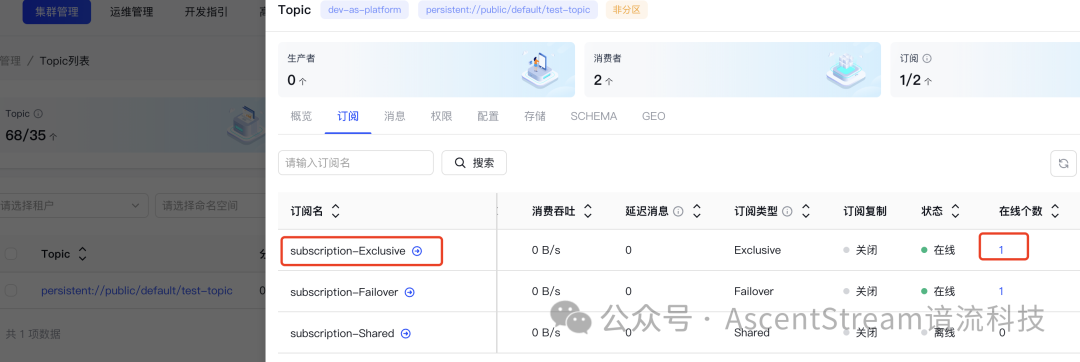
图例:通过 ASP Console 可以查看在线订阅数为 1
常用消费者配置
Pulsar 监听器 @PulsarListener 支持多种配置,包括:
-
常规配置:Topic 名称,订阅名称,Schema 类型等;
-
高级配置:自动启动、批处理和确认模式等;
-
自定义配置:可以通过properties参数拓展ConsumerConfigurationData以支持更多的自定义配置。
  @PulsarListener(
          schemaType = SchemaType.STRING,
          subscriptionName = "subscription-KeyShared",
          subscriptionType = SubscriptionType.Key_Shared,
          ackMode = AckMode.MANUAL,
          topics = {"${pulsar.topic.test-topic: test-topic}"},
          autoStartup = "true",
          batch = true,
          properties = { "ackTimeoutMillis=2000", "consumerName=consumerKeySharedB" }
  )
使用延迟消息
延迟消息可指定未来时间发送消息,这有非常多的业务场景,例如计费场景中的交易超时处理、团购砍价,车联网场景中的车辆定位信息周期性同步等。
    PulsarTemplate<byte[]> pulsarTemplate;
    //延迟消息发送
    public MessageId sendDelayMessage(String topic, T message, long delay, TimeUnit unit) throws PulsarClientException {
        /**
         * MessageCustomizer可以用来来配置消息延迟、在特定时间发送、禁用跨地域复制等。
         */
        return this.pulsarTemplate.newMessage(message).withTopic(topic)
                .withMessageCustomizer(m -> {
                    m.deliverAfter(delay,unit);
                }).send();
    }
    //延迟消息发送
    public MessageId sendDelayMessage(String topic, T message, long timestamp) throws PulsarClientException {
        return this.pulsarTemplate.newMessage(message).withTopic(topic)
                .withMessageCustomizer(m -> {
                    m.deliverAt(timestamp);
                }).send();
    }
使用死信队列
当消费者无法处理某条消息并超过设定的重试次数后,这条消息可以放到一个专门的队列,即死信队列(Dead Letter Queue, DLQ)中。这样做可以避免同一消息无限次重试,也给了开发人员或管理员对这些消息做补偿性旁路分析和处理的机会。
    //1.注册死信队列策略
    @Bean
    PulsarListenerConsumerBuilderCustomizer<String> consumerDeadCustomizer() {
        return (builder) -> builder
                .receiverQueueSize(500)
                .deadLetterPolicy(DeadLetterPolicy.builder()
                        .deadLetterTopic("test-topic-dead")
                        .maxRedeliverCount(1)
                        .build())
                ;
    }

   //2.模拟部分消息处理失败进入死信队列
   @PulsarListener(
            schemaType = SchemaType.STRING,
            subscriptionName = "subscription-Shared",
            subscriptionType = SubscriptionType.Shared,
            ackMode = AckMode.MANUAL,
            topics = {"${pulsar.topic.test-topic: test-topic}"},
            autoStartup = "true",
            batch = true,
            properties = { "consumerName=consumerSharedB" },
            consumerCustomizer = "consumerDeadCustomizer"
//            consumerCustomizer = "consumerRetryCustomizer"
    )
    public void listen4SharedB(List<Message<String>> messages, Consumer<String> consumer) {
        logger.info("consumer {} received messages, size: {}", consumer.getConsumerName(), messages.size());
        messages.forEach((message) -> {
            logger.info(message.getValue());
            int a = 1 / 0;
            consumer.negativeAcknowledge(message);
        });
    }

   //3.创建一个单独的Listener来处理死信队列中的消息
    @PulsarListener(
            schemaType = SchemaType.STRING,
            subscriptionName = "subscription-Shared",
            subscriptionType = SubscriptionType.Shared,
            ackMode = AckMode.MANUAL,
            topics = {"test-topic-dead"},
            autoStartup = "true",
            batch = true,
            properties = { "consumerName=consumerSharedB4Dead" }
    )
    public void listen4SharedB4Dead(List<Message<String>> messages, Consumer<String> consumer) {
        logger.info("consumer {} received messages, size: {}", consumer.getConsumerName(), messages.size());
        messages.forEach((message) -> {
            logger.info(message.getValue());
            try {
                consumer.acknowledge(message);
            } catch (PulsarClientException e) {
                throw new RuntimeException(e);
            }
        });
    }
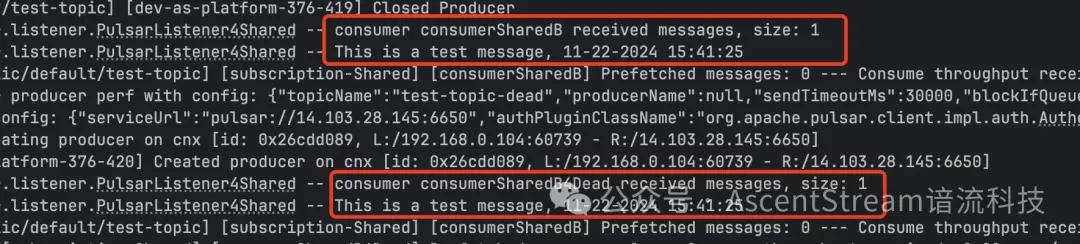
图例:consumerSharedB代码中使用 1 / 0 模拟消费异常。异常触发后消息将进入deadTopic. consumerSharedB4Dead
附录1:四种消费模式使用介绍
使用Failover 订阅
Pulsar 通过Failover订阅模式提供了一种高可用的消费方式。在这种模式下,多个消费者可以连接到同一个订阅,但在任一时刻,只有一个消费者(称为主消费者)被授权可消费消息。因此,当主消费者出现问题后,备用的消费者将自动接替。灵活使用这个高可用模式,可以巧妙解决许多需要高可用的场景。
    @PulsarListener(
            schemaType = SchemaType.STRING,
            subscriptionName = "subscription-Failover",
            subscriptionType = SubscriptionType.Failover,
            ackMode = AckMode.MANUAL,
            topics = {"${pulsar.topic.test-topic: test-topic}"},
            autoStartup = "true",
            batch = true,
            properties = { "consumerName=consumerFailoverA" }
    )
    public void listen4FailoverA(List<Message<String>> messages, Consumer<String> consumer) {
        logger.info("consumer {} received messages, size: {}", consumer.getConsumerName(), messages.size());
        messages.forEach((message) -> {
            logger.info(message.getValue());
            try {
                consumer.acknowledge(message);
            } catch (PulsarClientException e) {
                throw new RuntimeException(e);
            }
        });
    }

    @PulsarListener(
            schemaType = SchemaType.STRING,
            subscriptionName = "subscription-Failover",
            subscriptionType = SubscriptionType.Failover,
            ackMode = AckMode.MANUAL,
            topics = {"${pulsar.topic.test-topic: test-topic}"},
            autoStartup = "true",
            batch = true,
            properties = { "consumerName=consumerFailoverB" }
    )
    public void listen4FailoverB(List<Message<String>> messages, Consumer<String> consumer) {
        logger.info("consumer {} received messages, size: {}", consumer.getConsumerName(), messages.size());
        messages.forEach((message) -> {
            logger.info(message.getValue());
            try {
                consumer.acknowledge(message);
            } catch (PulsarClientException e) {
                throw new RuntimeException(e);
            }
        });
    }
示例代码的Failover订阅模式,默认开启两个消费者。当一个消费者下线后,另一个将迅速接管。
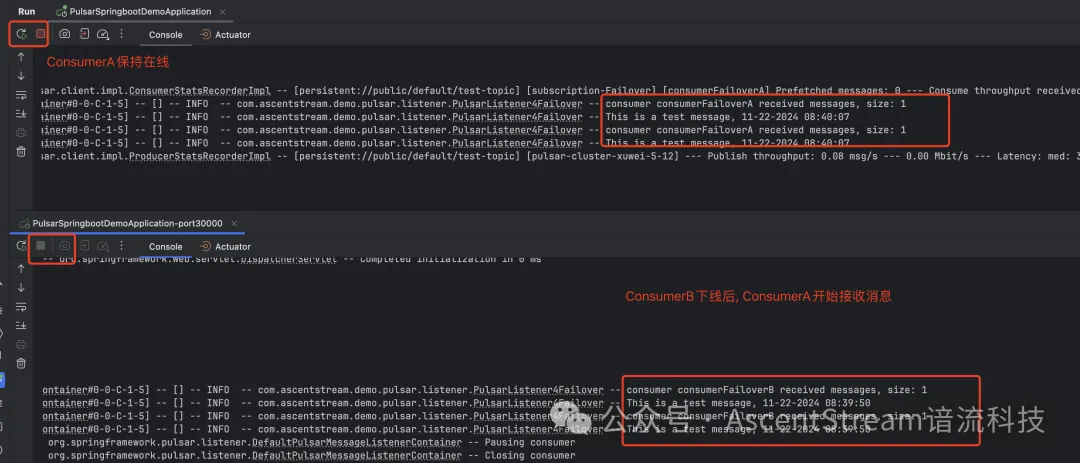
从ASP Console也可以看到,消费者的在线个数快速从 2 变为 1.


使用Shared 订阅
Pulsar 的 Shared 订阅模式允许多个消费者同时从同一个订阅消费消息。在这种模式下,消息将尽量均匀的分配给所有消费者,通过增加消费者就可以快速提升消息处理的并发量。这种模式非常适合于需要消息负载均衡和高吞吐量的应用场景。这也是使用非常多的消费模式。
    @PulsarListener(
            schemaType = SchemaType.STRING,
            subscriptionName = "subscription-Shared",
            subscriptionType = SubscriptionType.Shared,
            ackMode = AckMode.MANUAL,
            topics = {"${pulsar.topic.test-topic: test-topic}"},
            autoStartup = "true",
            batch = true,
            properties = { "consumerName=consumerSharedA" },
            consumerCustomizer = "consumerBatchReceiveCustomizer"
    )
    public void listen4SharedA(List<Message<String>> messages, Consumer<String> consumer) {
        logger.info("consumer {} received messages, size: {}", consumer.getConsumerName(), messages.size());
        messages.forEach((message) -> {
            logger.info(message.getValue());
            consumer.negativeAcknowledge(message);
        });
    }

    @PulsarListener(
            schemaType = SchemaType.STRING,
            subscriptionName = "subscription-Shared",
            subscriptionType = SubscriptionType.Shared,
            ackMode = AckMode.MANUAL,
            topics = {"${pulsar.topic.test-topic: test-topic}"},
            autoStartup = "true",
            batch = true,
            properties = { "consumerName=consumerSharedB" },
            consumerCustomizer = "consumerRetryCustomizer"
    )
    public void listen4SharedB(List<Message<String>> messages, Consumer<String> consumer) {
        logger.info("consumer {} received messages, size: {}", consumer.getConsumerName(), messages.size());
        messages.forEach((message) -> {
            logger.info(message.getValue());
            try {
                consumer.acknowledge(message);
            } catch (PulsarClientException e) {
                throw new RuntimeException(e);
            }
        });
    }
示例代码的Shared订阅模式中,默认启用 2 个消费者来轮流接收消息。
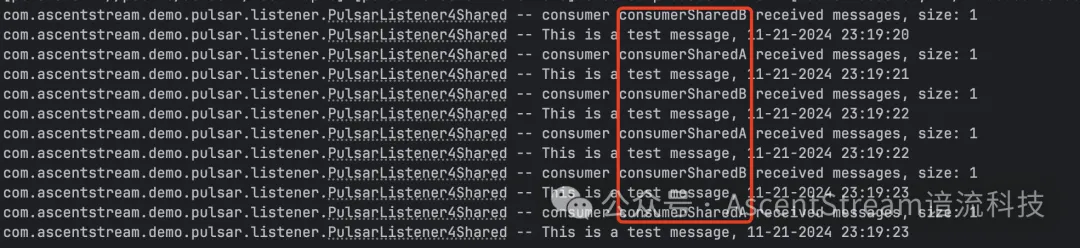
图例:Shared 模式中,消费者 A 和 B 轮流消费收到的消息。
使用Key_Shared 订阅
Pulsar 的Key-Shared 订阅模式是 Shared 订阅的一种增强形式,它不仅允许多个消费者从同一个订阅中并行消费消息,而且通过确保相同键(Key)的消息总是由同一个消费者处理保证了相同 Key 下的顺序性。因此Key-Shared 模式既包含了 Shared 订阅的高吞吐量特性也能提供同 Key 下的消息顺序性保障,极大丰富了使用场景。
    /*
     * Key_Shared订阅模式下, 同一Key消息会分发到同一个consumer处消费.
     */
    @PulsarListener(
            schemaType = SchemaType.STRING,
            subscriptionName = "subscription-KeyShared",
            subscriptionType = SubscriptionType.Key_Shared,
            ackMode = AckMode.MANUAL,
            topics = {"${pulsar.topic.test-topic: test-topic}"},
            autoStartup = "true",
            batch = true,
            properties = { "consumerName=consumerKeySharedA" }
    )
    public void listen4KeySharedA(List<Message<String>> messages, Consumer<String> consumer) {
        logger.info("consumer {} received messages, size: {}", consumer.getConsumerName(), messages.size());
        messages.forEach((message) -> {
            logger.info("MessageKey: {}, MessageValue: {}", message.getKey(), message.getValue());
            try {
                consumer.acknowledge(message);
            } catch (PulsarClientException e) {
                throw new RuntimeException(e);
            }
        });
    }

    @PulsarListener(
            schemaType = SchemaType.STRING,
            subscriptionName = "subscription-KeyShared",
            subscriptionType = SubscriptionType.Key_Shared,
            ackMode = AckMode.MANUAL,
            topics = {"${pulsar.topic.test-topic: test-topic}"},
            autoStartup = "true",
            batch = true,
            properties = { "consumerName=consumerKeySharedB" }

    )
    public void listen4KeySharedB(List<Message<String>> messages, Consumer<String> consumer) {
        logger.info("consumer {} received messages, size: {}", consumer.getConsumerName(), messages.size());
        messages.forEach((message) -> {
            logger.info("MessageKey: {}, MessageValue: {}", message.getKey(), message.getValue());
            try {
                consumer.acknowledge(message);
            } catch (PulsarClientException e) {
                throw new RuntimeException(e);
            }
        });
    }
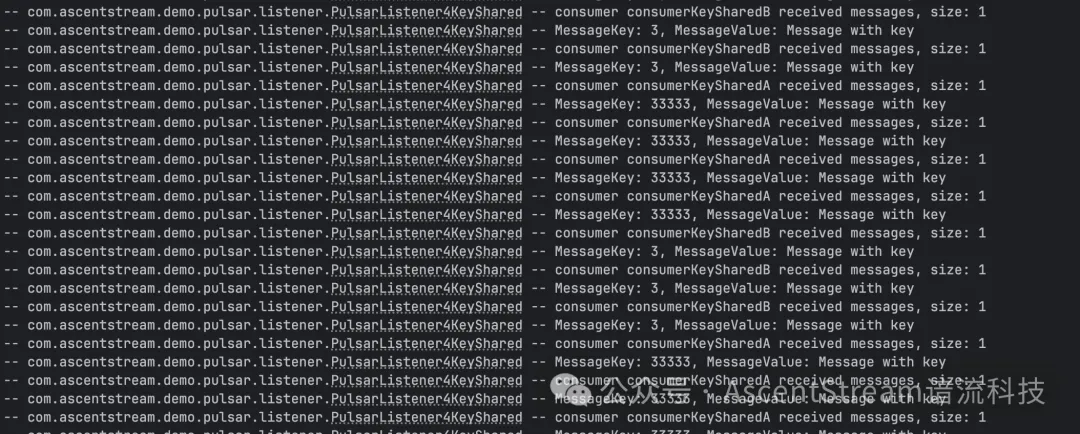
图例:示例代码的Shared订阅模式中,当key=3,由consumerKeySharedB消费,当key=33333 由consumerKeySharedA消费。
使用Exclusive订阅
Pulsar 的 Exclusive 订阅模式是一种严格的消费模式,同一时间只有一个消费者可以订阅并消费。如果有其他消费者尝试使用同一个订阅,将会失败。这种模式确保了消息的顺序性和消费的独占性,非常适合需要精确控制消息消费者和确保消息顺序的应用场景。
具体的代码示例可参考开启订阅和消费章节。
附录 2:高级特性使用
批量接收消息使用介绍
在spring-boot-starter-pulsar中可以方便的定制各种 Pulsar 策略,我们以注册一个自定义的批量接收消息策略(BatchReceive)为例来说明。
- 批量接收策略可以限制单个批次中消息的数量和字节数,并且可以指定等待该批次足够消息的超时时间。
- 只要满足任何一个条件(有足够的消息数,有足够的消息大小,等待超时),就会完成此批接收。
代码示例中:
- 如果设置 maxNumMessages = 5, maxSizeOfMessages = 1MB 并且没有超时,这意味着 Consumer.batchReceive()将一直等待,直到有足够的消息。
- 如果设置maxNumberOfMessages = 0,maxNumBytes = 0,timeout = 100ms,表示Consumer.batchReceive()无论消息是否足够,都会等待100ms。
注意:必须指定消息限制(maxNumMessages,maxNumBytes)或等待超时。否则,Messages ingest Message 将永远不会结束。
    //1.注册自定义BatchReceive策略
    @Bean
    PulsarListenerConsumerBuilderCustomizer<String> consumerBatchReceiveCustomizer() {
        return (builder) -> builder
                .receiverQueueSize(500)
                .batchReceivePolicy(BatchReceivePolicy.builder()
                        .maxNumBytes(1024*1024*10)
                        .maxNumMessages(5)
                        .timeout(1000*10, TimeUnit.MILLISECONDS).
                        build()
                );
    }

    //2,接收消息, @PulsarListener注解中consumerCustomizer属性指定consumerBatchReceiveCustomizer定义实例
    @PulsarListener(
            schemaType = SchemaType.STRING,
            subscriptionName = "subscription-Exclusive",
            subscriptionType = SubscriptionType.Exclusive,
            ackMode = AckMode.MANUAL,
            topics = {"${pulsar.topic.test-topic: test-topic}"},
            autoStartup = "true",
            batch = true,
            properties = { "consumerName=consumerExclusiveA" },
            consumerCustomizer = "consumerBatchReceiveCustomizer"
    )
    public void listen4ExclusiveA(List<Message<String>> messages, Consumer<String> consumer) {
        logger.info("consumer {} received messages, size: {}", consumer.getConsumerName(), messages.size());
        messages.forEach((message) -> {
            try {
                consumer.acknowledge(message);
            } catch (IOException e) {
                throw new RuntimeException(e);
            }

        });
    }

图例:在每批设置 5 条消息的场景测试中,第 6 条消息将在第二批被消费到。
最后
Spring for Apache Pulsar和 Pulsar Client 的兼容性说明
使用spring-boot-starter-pulsar项目开发 Pulsar 应用时,需要注意相互之间版本的兼容性:
- 参考兼容性说明:Pulsar Clients and Spring Boot Compatibility :: Spring Pulsar[4]

值得注意的是:
- 如果要使用 2.11.x 及以下版本的 Pulsar Client,需要使用
spring-pulsar-spring-boot-starter的0.2.x.版本的依赖。注意这里名字之后做了变更,同时该依赖 Spring 官方已不在维护,因此也不再推荐使用。 - 推荐使用 Pulsar Client 3.0.x 及以上版本,包括 3.0.x、3.1.x、3.2.x 等,而此时的JDK 的依赖已经来到了
Java 17。示例代码及使用了SpringBoot 3.2.5 + spring-boot-starter-pulsar 3.2.5版本。
参考资料
- spring-pulsar 官方仓库:https://github.com/spring-projects/spring-pulsar[5]
- spring-pulsar 官方文档:https://spring.io/projects/spring-pulsar[6]
- 老版本Spring Boot Starter Pulsar:https://mvnrepository.com/artifact/org.springframework.boot/spring-boot-starter-pulsar[7]
- 新版本spring-pulsar-spring-boot-starter:https://mvnrepository.com/artifact/org.springframework.pulsar/spring-pulsar-spring-boot-starter[8]
示例代码
- 本项目示例代码仓库:springboot-pulsar-example:https://github.com/ascentstream/springboot-pulsar-example[9]
注意:项目的启动类中包含有4种订阅模式定义的Bean,大家可按需使用。
@ComponentScan(basePackages = {"com.ascentstream.demo"},
        excludeFilters = {
        @ComponentScan.Filter(type = FilterType.ASSIGNABLE_TYPE, classes = {
                PulsarListener4Exclusive.class,
                PulsarListener4Failover.class,
                PulsarListener4Shared.class,
                PulsarListener4KeyShared.class,
        })
})
@EnablePulsar
public class PulsarSpringbootDemoApplication extends SpringBootServletInitializer
示例中还包含生产消息的 API。
http://localhost:20000/healthcheck/produce -- 发送一条String测试消息
http://localhost:20000/healthcheck/produce4json -- 发送一条JSON测试消息
http://localhost:20000/healthcheck/produce4key?key=111 -- 发送一条指定key的String消息
http://localhost:20000/healthcheck/produce4delay?delay=10 -- 发送一条延迟10s的String消息
参考资料
[1] Spring Boot Starter Pulsar: https://github.com/spring-projects/spring-pulsar
[2] Run a standalone Pulsar cluster locally: https://pulsar.apache.org/docs/next/getting-started-standalone/
[3] spring-boot-starter-pulsar: https://mvnrepository.com/artifact/org.springframework.boot/spring-boot-starter-pulsar
[4] Pulsar Clients and Spring Boot Compatibility :: Spring Pulsar: https://docs.spring.io/spring-pulsar/reference/appendix/version-compatibility.html#version-compatibility
[5] https://github.com/spring-projects/spring-pulsar: https://github.com/spring-projects/spring-pulsar
[6] https://spring.io/projects/spring-pulsar: https://spring.io/projects/spring-pulsar
[7] https://mvnrepository.com/artifact/org.springframework.boot/spring-boot-starter-pulsar: https://mvnrepository.com/artifact/org.springframework.boot/spring-boot-starter-pulsar
[8] https://mvnrepository.com/artifact/org.springframework.pulsar/spring-pulsar-spring-boot-starter: https://mvnrepository.com/artifact/org.springframework.pulsar/spring-pulsar-spring-boot-starter
[9] https://github.com/ascentstream/springboot-pulsar-example: https://github.com/ascentstream/springboot-pulsar-example
</div>相关推荐
- 「第三届开放原子大赛」获奖队伍专访来啦!企业篇
- 从本体论到落地实践:制造业数字化转型的核心逻辑与工具选择 | 葡萄城技术团队
- 轻松搞定Excel公式错误:SpreadJS让表格开发不再头疼 | 葡萄城技术团队
- vivo GPU容器与 AI 训练平台探索与实践
- SQLShift V6.0 发布!函数迁移&达梦适配一步到位!
- Oinone × AI Agent 落地指南:别让 AI Agent 负责“转账”:用神经-符号混合架构把它从 Demo 拉进生产
- 借助 Okta 和 NGINX Ingress Controller 实现 K8s OpenID Connect 身份验证
- 同样是低代码,为什么有人扩容有人烂尾?答案藏在交付体系里-拆解 Oinone 的交付底座


